How to Write a Check: A Comprehensive Guide
Writing a check may seem like a lost art in today’s digital age, but there are still situations that require this traditional form of payment. According to the Federal Reserve Bank of Atlanta, the number of checks paid in the United States has been declining since the mid-1990s. In 2018, the number of checks paid was 14.5 billion, down from a peak of 49.5 billion in 1995. Whether you’re paying rent, making a donation, or settling a bill, knowing how to write a check correctly is essential. In this comprehensive guide, we will walk you through the step-by-step process, covering everything from filling out the check to balancing your checkbook. By the end, you’ll be equipped with the knowledge and confidence to handle check transactions with ease.
1. Understanding the Basics of a Check
Before we dive into the details of writing a check, let’s familiarize ourselves with the different components of a check:
- Payee and Payer Information: The payee is the individual or entity who will receive the funds, while the payer is the person or organization issuing the check. This information is crucial for accurate and secure transactions.
- Check Reconciliation: This process involves comparing your checkbook balance with your bank statement to ensure they align. It helps you identify any discrepancies or errors in your financial records.
- Bank Branch: A physical location where you can visit to conduct banking transactions, such as cashing or depositing a check.
- ATM: An automated teller machine that allows you to perform various banking functions, including check deposits and withdrawals.
- Retail Store: Some retail establishments offer check cashing services, allowing you to convert a check into cash on the spot.
- Payee’s Address: The address of the individual or entity to whom you are writing the check. This information helps ensure accurate delivery and processing.
- Check Recipient’s Bank: The financial institution where the payee has their account. This information is essential for check verification and processing.
Now that we have a solid understanding of these key terms, let’s move on to the next step.
2. Gathering the Necessary Information
Before you begin writing a check, gather all the necessary information to ensure a smooth and accurate transaction. Here’s what you’ll need:
- Payee’s Name: Write the full and accurate name of the individual or organization to whom you are making the payment. Avoid using nicknames or abbreviations to prevent any confusion or issues during processing.
- Date: Write the current date on the designated line in the top right-hand corner of the check. This helps establish the timeline and validity of the transaction.
- Dollar Amount in Numbers: In the designated box to the right of the payee’s name, write the exact dollar and cent amount of the payment using numerals. Be precise and double-check for accuracy.
- Dollar Amount in Words: On the line below the payee’s name, write the dollar amount in words. This acts as a backup and verification in case the numerical amount is unclear or altered.
- Memo Line (Optional): Use the memo line to provide a brief description or reference to the purpose of the payment. This can be helpful for your personal records or for the payee’s reference.
Now that you have all the necessary information, we can move on to the next step: filling out the check.
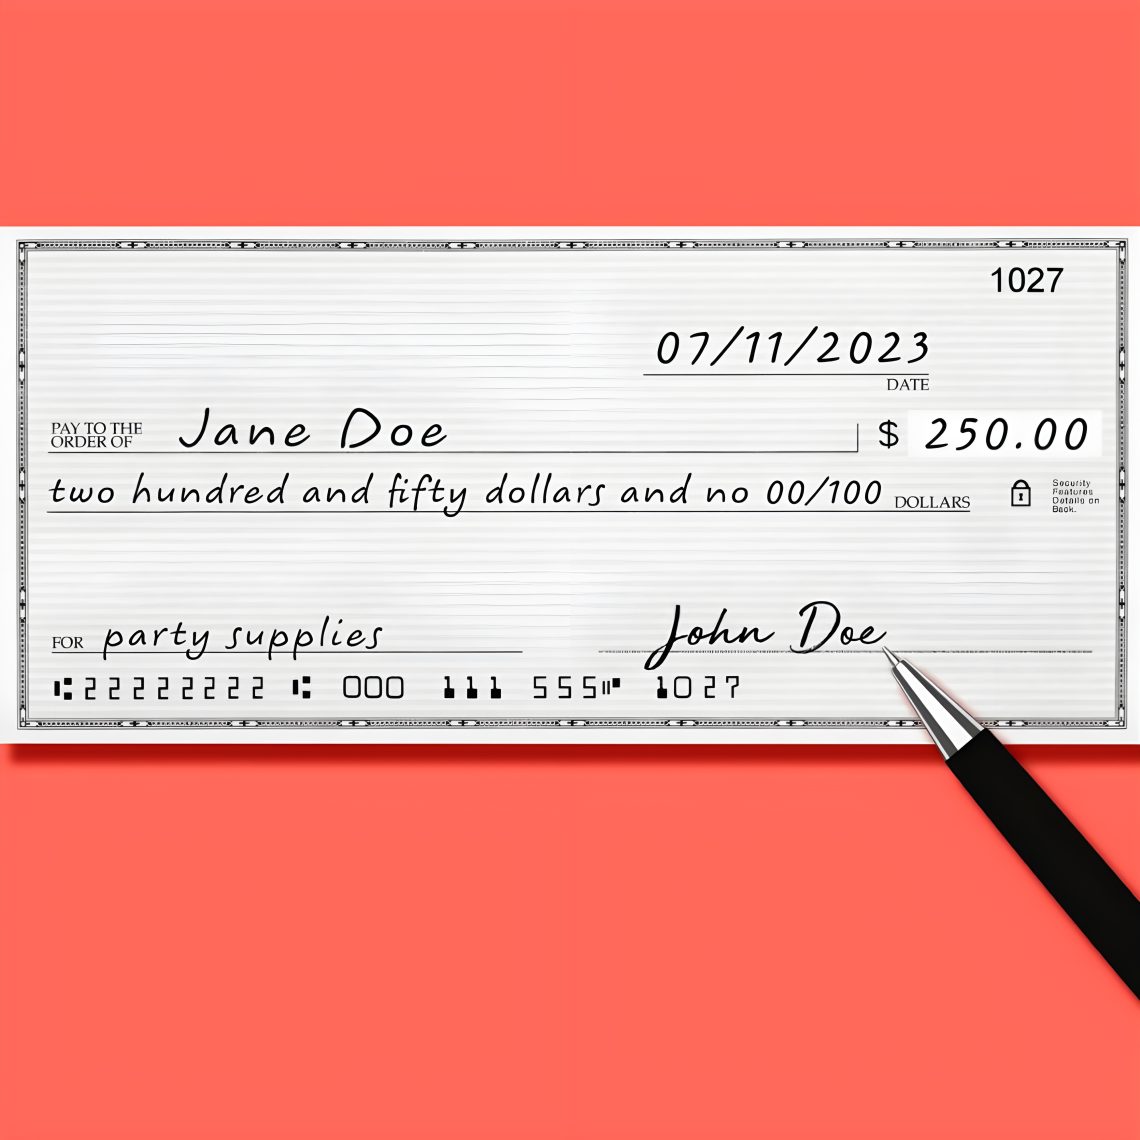
3. Filling Out the Check
Writing a check involves several key steps to ensure accuracy and security. Let’s break down each step in detail:
Step 1: Date the Check
Start by writing the current date on the line in the top right-hand corner of the check. You can use the numerical format (MM/DD/YYYY) or spell out the month, followed by the day and year (e.g., June 30, 2023). Be consistent with the format you choose and avoid future dates unless specifically required.
The date is crucial for record-keeping and helps establish the validity of the check. It also serves as a reference point for both the payer and payee.
Step 2: Write the Payee’s Name
On the line that says “Pay to the order of,” write the full and accurate name of the individual or organization who will receive the payment. Take care to spell the name correctly and avoid using nicknames or abbreviations. This ensures that the payment reaches the intended recipient and avoids any confusion or delays in processing.
Step 3: Enter the Dollar Amount in Numbers
Next, write the dollar and cent amount of the payment in numerical form in the designated box to the right of the payee’s name. Start writing as close to the left side of the box as possible to prevent any alterations or additions.
For example, if the payment amount is $250.75, write “250.75” in the box. Double-check for accuracy and ensure that the decimal point is clear.
Step 4: Write the Dollar Amount in Words
On the line below the payee’s name, write the dollar amount in words. This acts as a backup and verification in case the numerical amount is unclear or altered. Start writing as far to the left as possible and use clear, legible handwriting.
For example, if the payment amount is $250.75, write “Two hundred fifty and 75/100 dollars.” Be sure to include the word “dollars” at the end and use the fraction “75/100” to represent the cents portion.
If the payment amount is a round number without any cents, still include “and 00/100” after the dollar amount for clarity. For example, for a payment of $500, write “Five hundred and 00/100 dollars.”
Step 5: Complete the Memo Line (Optional)
If desired, you can use the memo line, located in the lower left-hand corner of the check, to provide a brief description or reference to the purpose of the payment. This can be helpful for your personal records or for the payee’s reference.
For example, if you are writing a check for rent payment, you can write “June rent” in the memo line. However, the memo line is optional, and leaving it blank does not impact the validity of the check.
Now that you’ve filled out the check, it’s time to move on to the next step: ensuring accuracy and security.
4. Ensuring Accuracy and Security
Accuracy and security are crucial when writing a check. Here are a few key points to keep in mind:
- Double-check all the information on the check, including the date, payee’s name, dollar amount (both in numbers and words), and the memo line (if applicable). Even a small error or omission can lead to payment issues or delays.
- Use a pen with permanent ink to ensure that the information cannot be easily altered or erased.
- Avoid leaving any blank spaces on the check. If there is extra space after the payee’s name or the dollar amount, draw a line to fill the remaining space. This prevents anyone from adding additional names or amounts.
- Keep your checkbook in a safe and secure location to prevent unauthorized access or misuse.
- Always keep a record of the check, including the check number, date, payee’s name, and dollar amount. This will be helpful for your personal records and future reference.
By following these guidelines, you can ensure the accuracy and security of your check transactions. A paper by Chakravorti and Emmons (2003) that investigates the effects of check truncation on the efficiency and security of the check clearing system. Check truncation is a process that converts a paper check into an electronic image that can be transmitted electronically, reducing the need for physical transportation and storage of checks. The paper evaluates the costs and benefits of check truncation for banks, consumers, and society as a whole.
5. Signing the Check
The signature line, located in the bottom right-hand corner of the check, is where you sign to authorize the payment. Your signature serves as proof that you agree to pay the specified amount to the designated payee.
Sign the check using your legal signature, which should match the name printed on the check. Use a consistent signature to establish a clear and recognizable mark. Avoid signing in pencil or using any erasable ink.
Remember, a check is not valid without a signature. Failure to sign the check may result in the payment being rejected or delayed.
6. Balancing Your Checkbook
Maintaining an accurate checkbook balance is essential for effective financial management. To ensure your records match those of your bank, follow these steps:
- Record the check in your checkbook register. Include the check number, date, payee’s name, and the dollar amount. Subtract the payment amount from your checkbook balance.
- Keep track of any other transactions, such as deposits, withdrawals, or fees, in your checkbook register.
- Regularly compare your checkbook register with your bank statement to confirm that the recorded transactions match. Look for any discrepancies or errors.
- If you notice any discrepancies, contact your bank immediately to resolve the issue.
Balancing your checkbook helps you stay on top of your finances and ensures that you have an accurate record of your transactions.
7. Depositing and Cashing a Check
Once you have written a check, the payee has a few options for depositing or cashing it:
- Bank Branch: The payee can visit their bank branch and deposit the check into their account. They may need to provide identification and endorse the check by signing the back.
- ATM: Many banks offer the option to deposit checks through an ATM. The payee can follow the instructions on the ATM screen to complete the deposit.
- Retail Store: Some retail establishments provide check cashing services. The payee can bring the check to a participating store and receive cash in exchange, usually for a fee.
Payees should consider the most convenient and secure option for depositing or cashing their checks based on their individual circumstances. The American Bankers Association reports that check fraud losses cost banks and businesses $1.3 billion in 2020.
8. Common Mistakes to Avoid
When writing a check, it’s important to avoid common mistakes that can lead to payment issues or security risks. Here are a few things to watch out for:
- Incomplete or Incorrect Information: Double-check all the information on the check, including the date, payee’s name, and dollar amount, to ensure accuracy.
- Neglecting to Sign the Check: Always sign the check on the designated line to authorize the payment. Failure to do so may result in the check being rejected or delayed.
- Leaving Blank Spaces: Fill out all the necessary fields on the check to prevent unauthorized alterations or additions.
- Using an Unsecured Checkbook: Keep your checkbook in a safe and secure location to prevent unauthorized access or misuse.
By avoiding these mistakes, you can ensure smooth and secure check transactions.
9. Additional Tips and Considerations
- Record-Keeping: Maintain a record of all your check transactions, whether in a physical checkbook register or through digital tools provided by your bank. This helps you keep track of your expenses and ensures accuracy in your financial records.
- Check Fraud Prevention: Be cautious and vigilant when writing and handling checks. Store your checkbook in a secure location, never leave blank checks unattended, and promptly reconcile your bank statements to identify any fraudulent activity.
- Digital Alternatives: Explore digital payment options, such as online bill payment or mobile banking apps, which offer convenience and security. These alternatives can help reduce the need for writing physical checks.
- Stay Informed: Keep up with any changes in check writing practices or regulations to ensure that you are using the most current and secure methods.
Conclusion
Writing a check may seem like a daunting task, but with the right knowledge and attention to detail, it can be a straightforward and secure payment method. By following the step-by-step process outlined in this guide, you can confidently fill out a check, ensure accuracy, and maintain control over your finances. Remember to stay informed about any updates or changes in check writing practices to adapt to evolving financial technologies. With these skills, you’ll be well-equipped to handle check transactions with ease and confidence. The National Automated Clearing House Association (NACHA) reports that ACH payments have surpassed check payments in the United States. In 2020, there were 28.6 billion ACH payments, compared to 14.5 billion checks paid.
Emily Davis
Emily Davis is an experienced workplace advocate and expert in succeeding at work. With a background in employment law and human resources, Emily brings a wealth of knowledge on topics such as salary negotiation, advancement strategies, and work benefits. She is passionate about promoting workplace fairness, inclusivity, and employee well-being. Emily's practical advice and tips empower individuals to thrive in their careers and create a positive work-life balance.
