Disabling Track Changes In Microsoft Word
Microsoft Word is a powerful tool that allows users to track changes made to a document. This feature is particularly useful when collaborating with others or when reviewing and editing a document. However, there may be instances when you want to disable the track changes feature. In this article, we will guide you through the process of disabling track changes in Microsoft Word, ensuring that your document remains unchanged and unmarked.
Why Disable Track Changes?
There are several reasons why you might want to disable track changes in Microsoft Word:
- Preserving the original content: If you want to share a document without any edits or revisions, disabling track changes ensures that the original content remains unchanged.
- Removing distractions: Track changes can be visually distracting, especially if there are numerous edits and comments. Disabling track changes allows you to focus solely on the content of the document.
- Preventing accidental edits: In some cases, you may want to prevent accidental edits or changes to the document. Disabling track changes provides an extra layer of protection.
Disabling Track Changes in Microsoft Word
Follow these steps to disable track changes in Microsoft Word:
Step 1: Open the Document
Open the Microsoft Word document that you want to disable track changes for. Make sure you have the document open in the Word editor.
Step 2: Access the Review Tab
Click on the “Review” tab in the Microsoft Word toolbar. The review tab contains various tools and options related to reviewing and editing documents.
Step 3: Locate the Track Changes Button
In the “Tracking” group of the review tab, locate the “Track Changes” button. The button may appear as a toggle switch, indicating whether track changes are currently enabled or disabled. Click on the button to access the track changes options.
Step 4: Disable Track Changes
In the track changes options menu, click on the “Track Changes” button again to disable track changes. The button should no longer appear as toggled on. This action will disable the track changes feature for the current document.
Step 5: Save the Document
After disabling track changes, make sure to save the document. Click on the “File” tab in the Microsoft Word toolbar and select “Save” or “Save As” to save the changes. Your document will now be saved without any track changes.
Frequently Asked Questions
Q: Can I selectively disable track changes for specific parts of a document?
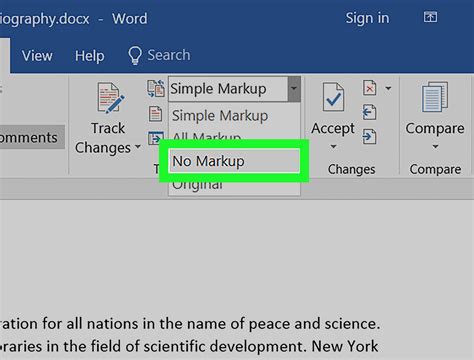
A: Yes, you can selectively disable track changes for specific parts of a document. This can be done by selecting the text or section that you want to exclude from track changes and applying the “No Markup” view. This will prevent any changes made to the selected text from being tracked.
Q: Can I still view the changes made to a document after disabling track changes?
A: Yes, even after disabling track changes, you can still view the changes made to a document. However, the changes will no longer be visually highlighted or marked as tracked changes. You can use the “Show Markup” option in the track changes menu to view the changes without the visual markup.
Q: Can I re-enable track changes after disabling it?
A: Yes, you can re-enable track changes after disabling it. Simply follow the same steps mentioned earlier to access the track changes options menu, and click on the “Track Changes” button to enable track changes.
Q: Can I password-protect a document to prevent changes?
A: Yes, you can password-protect a document to prevent changes. This provides an additional layer of security and prevents unauthorized users from making any edits or changes to the document. To password-protect a document, click on the “File” tab, select “Protect Document,” and choose the option to set a password.
Conclusion
Disabling the track changes feature in Microsoft Word allows you to preserve the original content of a document, remove distractions, and prevent accidental edits. By following the simple steps outlined in this article, you can easily disable track changes and ensure that your document remains unchanged and unmarked. Remember to save the document after disabling track changes to apply the changes permanently.
Sarah Thompson
Sarah Thompson is a career development expert with a passion for helping individuals achieve their professional goals. With over a decade of experience in the field, Sarah specializes in providing practical advice and guidance on job search strategies, cover letters, resumes, and interview techniques. She believes in empowering job seekers with the knowledge and tools necessary to navigate the competitive job market successfully.